With six different patios (I look after holiday accommodation!) I wanted to check that after installing pergolas I can offer shade while waiting for vines to grow over the structure.
Having done some research here are step-by-step guides to three different methods recommended for attaching shade cloth to cover a pergola. The Quick and Easy as well as two other, removable, techniques that give your shade a longer life and/or let you take down the shade for maintenance/preservation. In this guide, we will show and explain all of the key differences.
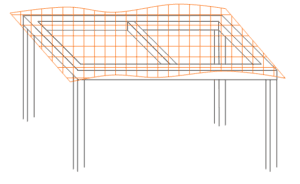
Unlike the other methods, this is most suited to a shade that has a reinforced edge. This method still uses points around the edge of the shade, either grommets (special holes) or clips, but the shade is tensioned by a continuous line being looped from structure to shade cloth and back, all the way around the perimeter.
It can be easily removed or re-tensioned but also suitable when the structure is not wood eg a tube frame, wire or attaching to fencing.
Which Shade Cloth Attachment Method is most suitable?
Length of Life
Most shade material is remarkably resilient being made from HDPE (High Density Polyethylene). These are monofilament threads that make an inherently mold and mildew resistant fabric. They are usually constructed into a knitted mesh which boast great dimensional stability, a high strength-to-weight ratio, and will not tear or fray if they’re cut or pierced. They can have different shade factor’s depending on the manufacturer and will drain when wet.
The key to a longterm and happy shade cloth installation is ensuring that the cloth is evenly tensioned in all directions, to avoid any single location being overstressed, and to avoid it from rubbing, flapping or moving against any part of the structure. It is the chafe (rubbing) along the edges of the structure that usually causes the shade cloth to deteriorate.
Permanent or Seasonal?
In many places, it may be necessary or desirable to remove the shade cloth for parts of the year. This might be to avoid a build-up and constant clearing of autumn leaves, to avoid damage from being overloaded with snow or simply to benefit from the warming effects of winter sun. The quick and easy removal of the shade will also mean that is relatively easy to re-tension, especially if you choose to have the shade suspended on the underside of your pergola rather than on top.
Above or Below?
Hanging the shade cloth underneath the structure will dramatically reduce the impact of abrasion and therefore increase the longevity of the shade. It can also mean that the removal and re-installation of the shade is straight forward and can even allow you to clean and clear the shade without removing the whole thing.
Suspending might also be an option if you are looking for shade for a short period of time whilst waiting for plants to grow over the top of your pergola/trellis.
How To: Quick and Easy Way to Attach Shade Cloth to A Pergola.
Time needed: 1 day
How to Attache Shade Cloth to a Pergola – Quick and Easy Method
Tools Required
Ladder Hammer Shade cloth Tape Measure Safety Goggles Sharp Cutting Tool (box cutter, stanley knife, sharp scissors, etc.) Fixings – Check out the full description below (nails/screws with washer, timber stud, timber fastener)
This job is much easier if done with a helper who also has a ladder.
Loosely Spread the Shade Cloth over the Frame
– Using the ladder, loosely spread the shade cloth over the entire structure. It should be lying flat with some excess (6″ / 150mm) over each edge.
– If your pergola/patio structure will require two or more sections of shade cloth then layout all the pieces and plan for the joins to be over a rafter; this will help conceal the join and ensure you can still keep the shade tensioned evenly.
Pro Tip: For the best appearance, line up the knitted lines of the shade cloth mesh to be parallel to the structure.
Check/Test your fixing installation method
– Each type of fixing will require a slightly different method for attaching the cloth and ensuring it is laying smooth when you do so. You want the shade to be tight, without any wrinkles but not under a lot of tension.
– You want the fixing to be sat on the top of the rafter with enough space on the outside edge of the rafter, after installation, to trim the excess cloth in a nice straight line.
Pro Tip – When you attach the fixing using nails or screws you want to ensure that it is tight and that the washer is holding/pinching the cloth against the wood not just the shaft of the nail/screw.
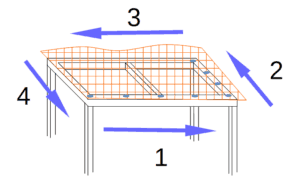
Attach the Shade Cloth along one of the long edges first.
– Starting at a corner and progress along one of the long edges of the structure, with fixings 12″-18″ (30-45cm) apart, applying a moderate amount of tension (not stretching the fabric) to the cloth between fixings.
– If you have an assistant then have them provide ‘even’ tension while you attach the fixings.
Top Tip – If your pergola structure is attached to the house, then fix this side first, before the shade cloth itself will restrict your access.
Continue fixing around the perimeter.
When you get to the end of the long edge of your structure then you turn and follow on around the perimeter, along the short edge. NB: If you reach the rafter where two shade cloths will join, then turn and follow that rafter as the short edge.
You then continue along the second long edge and finish on the last short edge.
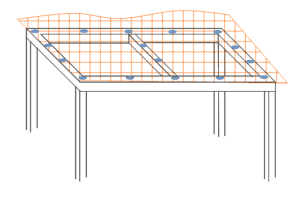
Fix the shade on any intermediate rafters/beams
Once your shade is smooth and evenly tensioned around the perimeter then fix the cloth on any of the intermediate supports. This will reduce the amount the shade can flex/flap in the wind and will, therefore, reduce the amount of abrasion on the edges.
Trim of the excess
– Now trim off any excess cloth. This can be done with scissors or a specialist fabric cutter or just carefully with a straight edge ruler and a sharp craft/xacto/box knife.
– The weave of the mesh material is such that it should not unravel, tear or fray, however, it is still best to leave as much as possible around the fixings whilst still keeping the cut edge out of sight.
How To: Easy and Removable Method
1. Tools Required
Ladder
Hammer – this job is much easier if done with an assistant who also has a ladder.
Shade cloth
Tape Measure
Safety Goggles
Sharp Cutting Tool (box cutter, stanley knife, sharp scissors, etc.)
Wood saw for cutting battens
Drill to pre-drill batten holes
Fixings – See full description below. Large head nails (easier to remove) or screws and washers.
Battens – 1″ x 2″ batten boards. Ideally, their length is the same as the width of your shade.
Note: There are various proprietary products that work in a similar way to using battens, in that they grip the cloth over a longer surface, making it easier and quicker to adjust the tension or remove the cloth. These are explained in greater detail with the fixings below.
2. Check your batten lengths
Place your battens on the top of the structure and arrange them so that they are completely around the perimeter without overlapping each other. Cut the battens as required but avoid having any that are too short (< 2″/60cm). Mark on each batten the locations where the fixings will be. These should be within 3″/10cm of the end of each batten and then spaced ~ every 18″ / 45cm. Identify and label where each batten will be located.
3. Pre-drill your batten
Pre-drill each fixing location on each batten to avoid them splitting when installing. It is not necessary to countersink the holes as the fixings will be going through a washer to help spread the load.
4. Loosely Spread the Shade Cloth over the Frame
Using the ladder, loosely spread the shade cloth over the entire structure. It should be lying flat with some excess (6″ / 150mm) over each edge.
– If your pergola/patio structure will require two or more sections of shade cloth then layout all the pieces and plan for the joins to be over a rafter; this will help conceal the join and ensure you can still keep the shade tensioned evenly.
Pro Tip: For the best appearance, line up the knitted lines of the shade cloth mesh to be parallel to the structure.
5. Roll batten board into the fabric on one of the long edges
With your assistant, roll the first batten board into the fabric so that the batten sits on top of the fabric with at least one complete roll. Ensure that it is smooth, tight and evenly rolled along the length of the batten. You are not trying to put the cloth under tension just avoiding any slack that will be pulled out when it is tensioned later.
6. Fix the batten board to the top of the structure on one of the long sides
Fix the first batten board down so that the edge of the batten is along the inside edge of your structure.
Note: If you require more than one batten along the long edge of your structure then ideally have enough assistance to roll the whole edge onto the battens at the same time. If not then when fixing the first batten do not make it tight against the structure until you have finished rolling in the battens on one complete side.
7. Trim the shade cloth
If you have a large amount of excess cloth at the end then you can happily roll it around the batten board up to 3 times but after that, the depth of cloth under the batten will impact the tensioning. Trim the cloth to suit.
It is much better to cut the cloth leaving it a little longer, then checking, than cutting off too much!
8. Roll the batten board, on the other long side, into the cloth and check tension.
Roll the batten board into the cloth on the other long edge, as you get closer to the final position where the board is able to lay flat on the structure you will start to tension the shade. It may be necessary to roll the cloth a few different times with slightly different starting points on the batten to ensure that the cloth is evenly tensioned when it can be fixed to the structure.
9. Tension the shade correctly
Over long lengths, it is necessary to try and ensure that the shade it evenly rolled and will therefore be evenly tensioned all along the full length of the batten.
However, it is more important for the shade to be evenly tensioned than for the batten board to be fixed straight or parallel to the structure. Ensure the shade is correctly tensioned and attach the fixing through the board to the structure accordingly, this may even mean deflecting the batten slightly.
Pro Tip: If using nails then do not finish hammering them all the way in, until you have ensured the end battens tension the shade correctly. This will allow for easier adjustment if required.
10. Repeat Steps 7,8 and 9 for the end edges.
Having tensioned the shade along the long edges it should be looking flat over the main area but may have some softer tension towards the middle at the ends. When you tension the end battens it may again be necessary to flex the batten to ensure then tension is even across the shade.
11. Finish the installation.
Check that all of the fixings are installed tightly and if required you can add further battens to the intermediate rafters although that is usually only needed when the shade is suspended by this method rather than on top of the pergola.
How To: Removable and Longer Lasting Method
1. Cloth Specifications
When measuring for a shade cloth it is suggested that the dimensions of the shade are ~6″ / 15cm smaller than the frame they are to be attached to as this allows space for the lacing and correctly tensioning.
To get the best out of your shade and to make it easy to remove at the end of the season it is suggested that it is suspended under the pergola so it doesn’t rub against any of the structure.
2. Measuring for your shade cloth
Unless you are getting a custom made cloth with edge tape and grommets (reinforced holes) then cutting the cloth to fit will mean using butterfly clips. The size of the shade cloth, therefore, becomes important as you need to allow for the cut edge to then be folded a couple of times before using the butterfly clip. Ensure you allow for this extra amount of material when cutting the shade.
Check with your cloth supplier for any specific advice.
3. Start in one corner
In the corner of the structure fix two of the hooks in place, one on the long edge and one on the short edge. (Note: These may be relocated at the end when you start to tension the shade but it gives a starting point.)
Using a short length of line, tie the corner of the shade to the hook on the short edge so it is about 3″ / 8cm away from the structure. If you then thread some line from the hook on the long edge through the same grommet in the corner of the shade you should have the corner of the shade roughly in place about 3″ / 8cm from each edge of the structure.
4. Repeat at the other end of the long edge.
Repeat in the second corner at the other end of the long edge. You should then have the shade cloth loosely hanging by two corners in approximately their final position. You can check the size of the shade accurately and get a feel for how tightly the lacing will need to be.
5. Placing the fixings along the long edge of the structure.
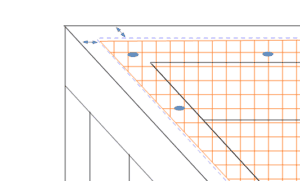
With the two corners of the shade approximately in place, you then position the hooks in the structure about halfway between the corner grommet and the next grommet. This ensures a nice even flow of the lacing and will make it much easier to tighten later. You want to try and avoid the grommet and the hooks being located next to each other.
Continue placing the hooks in the structure so that they will be at the midpoint between grommets. ie if the grommets are 12″ apart then the hooks will also be 12″ apart but staggered so they are not in line with the grommets.
6. Initial loose lacing.
With fixings all the way along the long edge you can then ‘lace’ the shade on that side. Only pull the shade up until it is approximately 5 inchs away from the structure.
7. Repeat Steps 5 and 6
Repeat the locating and installation of the hooks for the other three sides
8. Tensioning the corners
Ensuring that the corners are suitably tensioned will ensure that the lacing will not develop slack later from a knot sliding or the corner being pulled away.
At the first corner, you can now remove the short length of line used to initially hold the shade. Check that the direction of the initial lacing from where the end of the line is tied will keep the corner pulled out in both directions, towards the long edge and the short edge. Once you are happy that it cannot be pulled in one direction or the other you can gradually begin to tension the shade.
9. Tensioning the shade.
It is best to tension the shade a little at a time and go around the perimeter 3 or 4 times than trying to do it immediately. Otherwise you can easily have the shade offset to one side as you over tension that side first.
From the corner where the line is tied gradually progress around the perimeter of the shade pulling the line after each grommet slowly making it tighter. Initially you may be able to pull the line easily every three or four grommets but when trying to get the final tension, pulling after each grommet will give you the best results.
10. Final tension check.
When the shade is correctly tensioned it should be completely flat with no wrinkles. Any areas that are not flat suggest that more tension may be required. The nature of this type of installation is that the shade is evenly tensioned on all sides and that the lacing will gradually even out any discrepancies.
Fixings
Nails / Screws with 1″ / 2cm diameter washers
It is suggested that you use a nail with a fender washer, in preference to screws, to avoid snagging the mesh material.
These require a washer to help pinch the material to avoid the load being only on the shaft of the nail/screw. These, therefore, need to be fixed very securely. It is also advised to use at least a galvanized nail (or aluminum or stainless) to avoid it from rusting which will be unsightly but also increase the abrasion on the mesh.
These are simply placed on top of the mesh and hammered into place; they can be found in most hardware stores as generic versions or branded such as the Coolaroo. Their design helps spread the load across the whole fixing.
Butterfly clips
These ‘pinch’ together and grip along the edge of the shade material. They can then be used for lacing or attaching directly to a wire. Some designs will also provide a hole that can be used as a grommet.
When used on a newly cut edge of cloth then it is suggested that you fold the edge over a couple of times (as if making a seam when sewing) and then clip through to help spread the load and avoid the edge unraveling under tension.
Coolaroo Ezy Fix
This is a proprietary product that gives the same results as using batten boards but is easier to adjust the tension of the shade.
V-Grip
This is a proprietary product that gives the same results as using batten boards but is easier to adjust the tension of the shade.
Lacing Hooks
These are used for lacing when you are not going around the structure itself. If you plan to remove the shade cloth then using the open hooks can save a lot of time but you need to ensure they are good quality so as not to bend open when under tension.
They should be at least galvanized, aluminum or best of all stainless steel to ensure they do not corrode.