As part of the planning for a Pergola, there is a lot to consider, even BEFORE buying anything or starting to build! In planning for the four outside patios for our holiday accommodation I have collated all of the different aspects for you, regarding location, design, and construction to help you avoid missing any tips that can improve the end result.
- 1. Sun Position
- 2. Will a Pergola make a house dark?
- 3. What is a Freestanding Pergola?
- 4. What direction should a pergola face?
- 5. Route to your Pergola?
- 6. What Height should Pergola be?
- 7. What is a good size for a pergola?
- 8. Overhangs
- 9. Do you need a permit to build a pergola?
- 10. How to secure a Pergola?
- 11. Is it cheaper to buy or build a pergola?
- 12. Should I paint or stain my pergola?
LOCATION
1. Sun Position
As the sun moves from East to West during the day the location and size of the shade that is offered will also move. If your main reason for a pergola is to allow you to sit outside for lunch in the autumn then your plan will need to be slightly different than if you wish to sit at the same table for breakfast in the spring. It is obviously possible to shade both scenarios but acknowledging the changes helps you adjust your expectations. A useful indication of how the shade will change through the year can be found http://shadowcalculator.eu.
2. Will a Pergola make a house dark?
When built next to your house, whether freestanding or attached, the Pergola can have knock-on effects.
- The key purpose of a Pergola is to offer shade but if it is constructed outside of a window this may result in the room feeling too dark. As the pergola will be in situ all year round you need to remember how the additional shade will affect the amount of light entering the room in winter when it is overcast. It is, however, possible to choose a design that has a reduced impact such as one that relies on plants that lose there leaves in the winter or where the shade is from cloth and it is retractable. Check out the other options for adding shade to your pergola or shade options for your patio area.
- Keeps the house cooler. Just as it can make internal rooms darker it will also help to keep the external structure of the house cooler.
- Styling. When right next to your house the styling of your Pergola is more likely to be guided by the decisions (colors, textures, etc) you have made for your house.
3. What is a Freestanding Pergola?
Nearly all the standard Pergola kits are freestanding. That is to say, they do not need any other structures as part of there construction. They come with four posts and all of the rafter/crossbeams required.
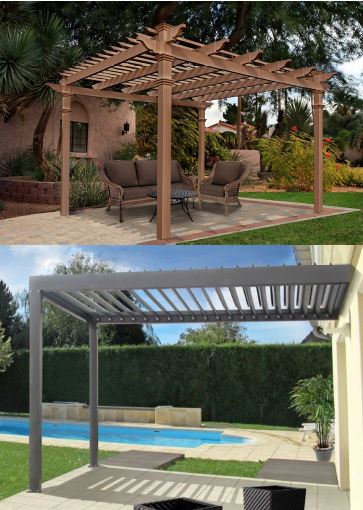
An attached Pergola is one that uses the structure of another building as part of its own. The most common method is using the outside wall of a house to replace the posts on one side of the Pergola. This can maybe save a little on construction costs but its appeal is usually the removal of the posts creating more useable space underneath.
NOTE: A freestanding Pergola does NOT mean it is not next to a house. It is very common to build a completely independent freestanding pergola structure right next to your property.
Being Freestanding the Pergola structure will not put any strains on your house when it flexes in the wind or during dry summers or frozen winters when the ground might move, particularly if it has independent footings for its posts. It also avoids any piercings into the outer fabric of your building reducing any chance of water damage and potentially avoiding additional planning permissions. (see point 9 below)
4. What direction should a pergola face?
In most cases, the location of your Pergola will be limited to one spot but it is possible to adapt the design to make it the most suitable for your particular requirements.
As the sun is continuously moving the location and amount of shade that any structure offers will also be constantly changing. Deciding when (eating lunch outside, reading in the afternoon, entertaining in the evening) you are most likely to want the benefit from the shade is the starting point. You can then adjust the height and/or direction of rafters or crossbeams to make them perpendicular to the sun at that time of day.
If you have more flexibility in the location of your Pergola then consider that the effects of the sun are usually most intense in the afternoon. This is when the ambient conditions have had all morning to warm up and as the sun starts to get a bit lower it will shine directly onto the face of walls (as opposed to being higher in the sky and shining more on the top). If you are using the Pergola to offer shade for the house as well, then placing it on the southwestern side ( in the northern hemisphere) will gain the most benefit.
5. Route to your Pergola?
For me, the route to each Pergola is straight forward as they will be over the patio areas right outside the backdoor for each accommodation. I did, however, have to consider the post locations as for a conventional rectangular shape (I want freestanding structures) they would make access a little awkward. As I am self-building I have adapted my design.
Other things to consider regarding placement and access are:
- Avoid building near immature trees that may interfere with the structure as they get bigger
- Will guests or family take a shortcut through your favourite flower bed?
- Are there any hazards that will make the placement dangerous to visitors; steps, rocky ground, protruding tree stumps, low hanging branches, etc.
DESIGN
6. What Height should a Pergola be?
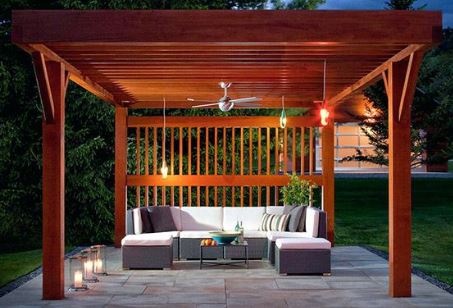
The height of your finished structure will have an impact on its aesthetics but in most cases, the range seems to be between 8′ and 10′ (2.4m – 3m). The aesthetic aspects are discussed further below when looking at overall size, but there are a few other things you should also consider.
- The clearance height on the underside. When thinking about your design you should start by considering the amount of clearance height you want. It is quite possible on a custom design for the dimensions of the rafters and crossbeams to equal up to ~18 inches (0.45m) of height. Therefore a structure with a total height of 8’4″ (2.54m) would only have an underside clearance of 6’10” (2.1m). As a minimum, the height on the underside should be 6’8″ (2m) which is the same as door height.
- Remembering future accessories. Once constructed you may want to add lights, fans, speakers, etc. If they hang below the rafters then in order to maintain the minimum clearance the total height will need to go up.
- Roofline. If you are attaching your Pergola to your house or placing it next to it then you will probably want to stay below the roofline. There are techniques that can be used on properties with a very low roofline such as adding an open gable but this then becomes a bigger project.
7. What is a good size for a pergola?
Its all about proportions! In determining the size of your Pergola you might be limited by the location but you may still have the ability to adjust the proportions. That is the ratio of the length to the height of your structure. It has been shown that humans (and nature generally) find the ratio of 1 : 1.618 as the most aesthetically pleasing. It dates back to Ancient Greece, is known as the golden ratio, and is widely found in nature but also in some of the most iconic pieces such as the Mona Lisa or the Eiffel Tower.
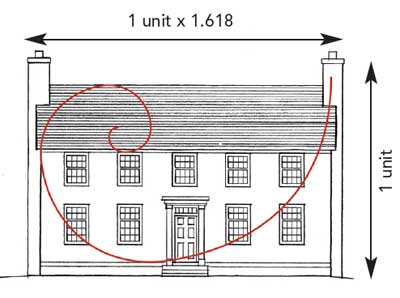
This ratio suggests that a Pergola with a length of 1.618 times its height will give an aesthetic balance that is appealing. As an example, if your Pergola is to be 94″ (2.4m) high then as a starting point you could consider a length of 152″ (3.9m). That is 94″ x 1.618 = 152″.
Obviously there will be many scenarios where this exact ratio just doesn’t work but a general guide of a ratio somewhere between 1.5 – 1.75 is still considered appropriate. For more info on Golden Ratio.
8. Overhangs
When buying the Pergola Kits then obviously you are limited by the designs available but if like me you are thinking of building your own, then all the dimensions are adaptable. The most significant one to my plans was realizing that the posts are not at the edge of the roof. By changing the size of the overhangs I was able to maintain the larger size of shade but relocate a post for a better footing.
CONSTRUCTION
9. Do you need a permit to build a pergola?
This obviously depends on your local building regulations and you need to check as they may have specific requirements about total size and distances from public roads, utilities, fences, etc
However, in most places, the accepted definition by planning authorities is that a pergola is not considered a permanent structure. In most places, the concern is going to be over the height and as pergolas have a flat-top and do not have a pitched solid roof, that can interfere with sightlines of nearby properties, they often get treated more leniently than those structures that do, such as a Ramada.
If you are planning an attached Pergola then there may well be additional regulations relating to the fixings and method.
10. How to secure a Pergola?
When a Pergola with its open airy structure is compared to similar yard buildings with a pitched solid roof, like a Ramada or Gazebo, the weight of the finished Pergola structure is significantly less. They do however still need to have something to stop it sinking into the ground and to stop it blowing away! This can be in the form of Footings or simply fixings if the location already has a suitable format such as a concrete pad or deck.
How deep should a Pergola Post hole be?
Footings are designed to spread the load of a structure and to attach it firmly to the ground. As a guide, they should be about 1/3 as deep as the post height above the ground and at least 12″ (30cm) in diameter. eg If the post height above ground level is 10 feet then the footing depth should be 3.3 feet. In areas where you have a heavy ground frost, the footing would need to be at least 12″ below that ground frost level to avoid the footing ‘popping out’ when the ground freezes.
It is possible to either surface mount your post (common with pergola kits with precut post lengths) on top of the concrete or to have the post integral and inserted into the concrete footing. If inserted into the concrete then it is suggested to add an extra 4″ (10cm) of depth for compacted medium-sized gravel in the bottom of the hole to help with drainage.
For surface-mounted posts you can either add a post anchor to the concrete before it sets or drill holes into the concrete afterward as if you were attaching to a concrete slab.
NOTE: Before you start digging you should always make sure there are no utilities or services running in the area. In the USA be sure to ring 811 to get a free local utility survey!
Attaching to Concrete
Hardware stores seem to offer many different ways of attaching posts to concrete. For me, the key differences are if you are pouring new concrete to make a slab or footings underneath your pergola or if you are attaching to existing concrete.
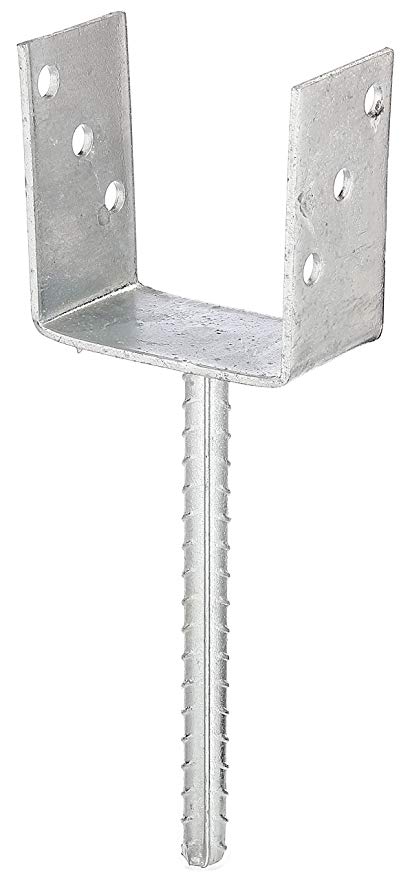
The anchors designed to be ‘set’ into the concrete when pouring, do not offer the same level of flexibility as those that you attach after the concrete has set. They are, however, potentially stronger and therefore more suited to larger custom designs. The added benefit is that most post anchors of this style mean that the bottom of the post is slightly above the level of the concrete and therefore less inclined to get wet and hold moisture, rotting the wood.
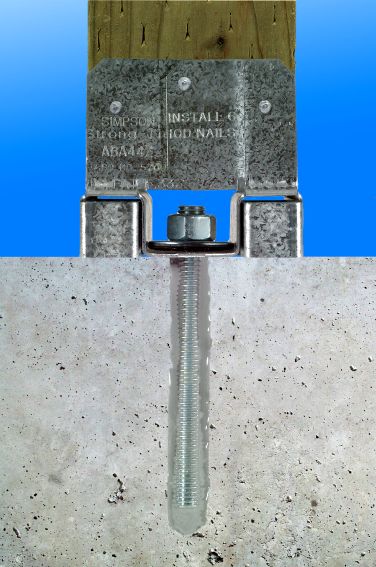
The surface-mounted attachments (such as a Simpson Strong-Tie’s ABA66 ) are most likely ‘cup’ shaped and will have a fixing that is inserted through the cup and into a hole drilled into the concrete. The post is then placed into the cup and securing nails fixed from the side through the cup and into the wood.
Attaching to a Patio
Adding your Pergola to offer shade over an existing patio is a common requirement but it is NOT advised to try and attach the posts to the patio itself. Although it will stop the posts from sinking into the ground it does not have the ability to secure it to the ground to stop it blowing away!
Instead, it is suggested that you remove the stones where the posts will be and dig concrete footings and then attach the pergola as outlined above. You would then replace the patio stones, trimmed accordingly.
Attaching to a Deck
Adding some shade to a deck with a Pergola may seem like an easy option, especially if you can already envision the matching wood and style. Although it can be done, just as with adding any structure to an existing structure you should seek professional guidance, ideally from the original deck builder to ensure the loads and footing sizes of the deck will also be suitable for the extended height and weight of the pergola.
11. Is it cheaper to buy or build a pergola?
This is only really a question if you are thinking of a wooden structure. For the modern Vinyl, fiberglass or even metal structures then buying a kit or custom design are the only options.
If you are comparing like for like in wood, then Homeadvisor suggests in most cases a kit will be cheaper than a DIY construction. It will certainly be quicker to construct and many of the headaches involved with a self-design (all the things you didn’t know you needed to think about!) will be avoided.
Obviously the compromise is in being constrained to the designs and sizes available to buy. If, however, you are comparing the costs of a DIY project to a custom pergola built by a pro then DIY can be significantly less. As the structure is relatively simple, there are many free plans available online that include, how to, sizes and quantities.
12. Should I paint or stain my pergola?
Research suggests that this is a question of cost and effort. You would only really be considering paint if cost is no issue, you do not want the wood grain to be visible or if you do not want to worry about touching up the finish for the next 10 years.
In all other cases using a stain, even a two-in-one product that is a stain-and-sealer will probably be cheaper, quicker, easier and more forgiving to dents or necessary repairs. When considering the options for painting a wooden deck Bob Vila discusses the need for at least 5 coats (preservative, primer, 2 coats of latex or oil-based and then a clear polyurethane sealer!
A good paint job will outlast a good stain treatment by a few years but in my experience, the ease of touching up or even recoating a stained structure still makes it my preferred choice.
Anything that I have missed? Let me know in the comments below

