Stages 1-3 of my Guide to ‘Everything’ for Shade Sails / Sun Shades. A little bit of planning before buying a sunshade can save you time and money later on, when it comes to getting it to fit properly, to look good and to ensure you get shade just where you want it. A poorly installed shade will not last as long and can cause damage if its attachment points and fixings are not considered. Having researched for my own installations these are the things I have discovered.
- Stages 4-6 – How to Install and Tension A Sun Shade
- Bonus – How to Install a Sun Shade Post
Stage 1: Location – Key Factors to Consider
1. Sun Position
As the sun moves from East to West during the day the location and size of the shade that is offered will also move. Therefore you will only have shade directly under the sun shade at midday, in the middle of summer, if you live of the equator!
If your main reason for a sun shade is to allow you to sit outside for lunch in the autumn then your plan will need to be slightly different than if you wish to sit at the same table for breakfast in the spring. It is obviously possible to shade both scenarios but rather than assuming you need one giant sun shade it may be better to consider multiple smaller shades. A useful indication of how the shade will change through the year can be found http://shadowcalculator.eu .
Top Tip
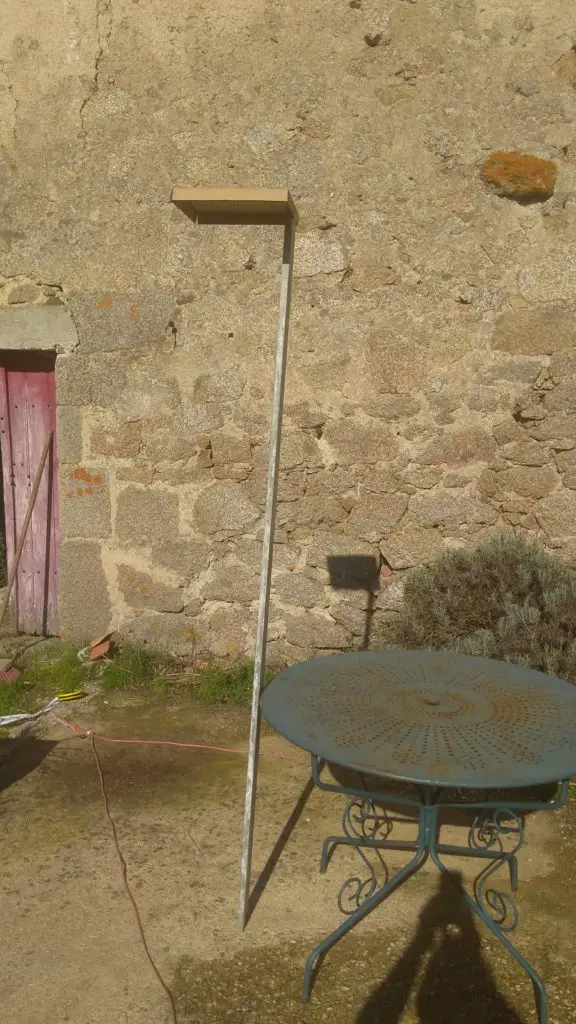
When planning your sun shade, add a flat piece of card to a pole/post at the same height you are planning for your sun shade. You can then hold it in place around the perimeter of your intended shade, at the time of day you are planning. This will allow you to see where the shadow falls (not straight down!) especially in regards to seating and where people might have the sun in their eyes. You can then adjust the location or size of your shade accordingly. In this example, the shadow is nearly 8ft / 2.5m away from the post position as early as 3pm in Sept. My intended shade will not work for afternoon drinks after the middle of September!
2. Local wind condition, direction and strength
In some locations, it is possible to predict the main direction and strength for the prevailing winds or storms. eg locations near to the coast may experience a ‘sea breeze’ (wind coming from the sea) every afternoon in the summer.
Now, this may not be a significant factor but if you also know that occasionally these can gust up to 80km/hr / 50mph then it could affect your choice of fixings and possibly the size and number of sun shades. Smaller shades are better at dealing with high winds but suddenly requiring extra posts or fixing points costs more and may not be appropriate. It may be that you decide you only rarely get really strong winds and when they are forecast you will take the shade down.
3. Strength of Existing Mounting Points
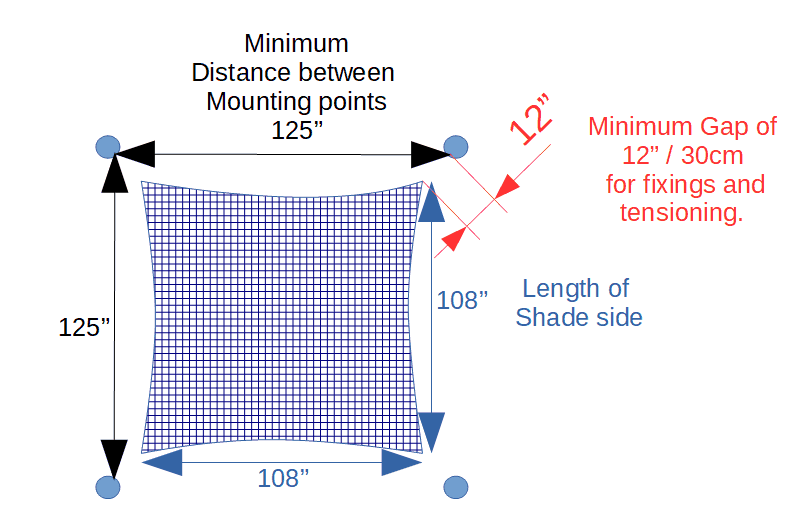
Having decided where your shade needs to be to get the shade you require, you then need to look for suitable mounting points. You will also now have an idea if you are thinking of a custom-sized shade or one of the standard sizes available. In both cases you should be allowing at least 12″ / 30cm beyond the corner of the sail to the mounting point, to allow for the fixings and tensioning device. For custom shades, you can then adjust the size of the shade to match up with strong mounting points.
For standard-sized shades, you will have to compromise and identify strong mounting points that are 12″ / 30cm beyond the corner of the sail or more. It is possible to extend the attachment point with the use of chain, wire strops or even non-stretching rope but if your only strong mounting point is closer, then you may have to consider a smaller shade as you will not be able to get it taut during installation.
Check How to Install and Tension A Sun Shade for advice on suitable mounting positions and fixings or How to Install a Sun Shade Post if you need to add a mounting point.
4. Changes in height
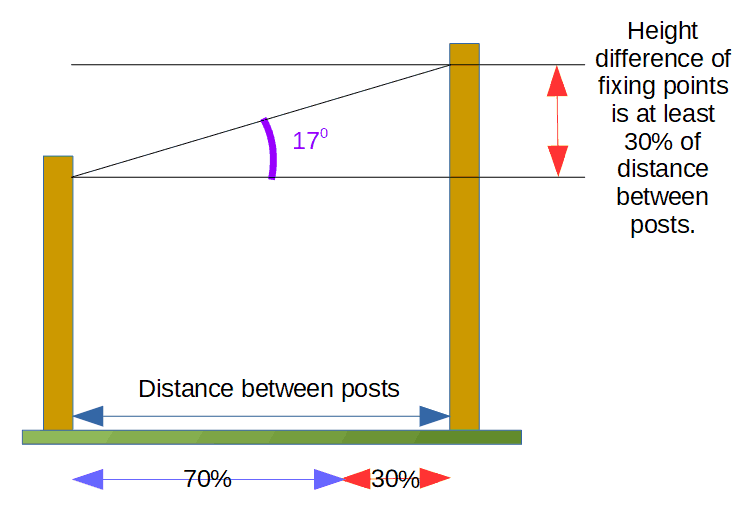
Horizontal shades may be the easiest to install and plan but they can cause you headaches later on. They are far more prone to holding water (even those that are porous!) and they can also gather leaves or other debris, that then causes them to stretch, stain, grow mold/algae or simply change the properties of the shade and reduce its life. Horizontal shades also tend to trap more hot air beneath them, reducing the cooling effect, compared with shades at angles with height changes.
Adding a change of height will allow water to drain faster, discourage debris from gathering and can reduce the effect caused by the wind. It can also make the shade more pleasing to look at and when planned effectively can actually increase the amount shade. Recommendations for how much change of height to use are quite varied but the minimum suggested is ~30% of the distance between posts (~17 degrees) and the maximum is really up to your personal choice.
A change of height of 30% is suitable as a minimum.
Distance between Posts | Change of height | Eg Height of the | then the Height |
10' ~ 3m | 3' ~ 0.9m | 8' 2" ~ 2.5m | 11' 2" ~ 3.40m |
15' ~ 4.5m | 4' 6" ~ 1.35m | 8' 2" ~ 2.5m | 12' 8" ~ 3.85m |
20' ~ 6m | 6' ~ 1.8m | 8' 2" ~ 2.5m | 14' 2" ~ 4.3m |
5. Sun Shade sides arent straight! Why?
When you purchase your shade the dimensions given are usually for the length between the corners of the shade but the shade itself does not follow these straight lines. The inward curve of the perimeter of the shade is called the ‘hollow’ and it helps distribute the tension evenly across the shade. This stops the middle sagging and ensures you do not have unsightly wrinkles or flapping.
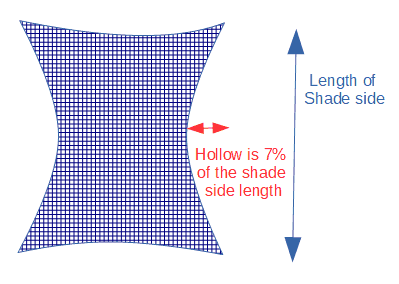
In most cases, the ‘hollow’ will be around 7% of the edge length between two corners.
eg the hollow on a 10′ x 10′ square sail is 8″ 3/8.
the hollow on a 3m x 3m square sail is 21cm.
Stage 2: Location – Things to Avoid
When reviewing the location there are some other key things to avoid to ensure you get the best installation and life out of your shade:
- BBQ / Firepit – While many of the materials used to manufacture the sun shade will be fire retardant it is still advised that you avoid any open flames. Not just the heat but also the chemicals within the smoke can affect the life of the shade.
- Chaffe – Once installed you do not want the shade to touch anything. Even just a light touch on a gutter downpipe, another sail or a small branch will cause that area to chafe and reduce the life of the shade. It is much much easier to extend the attachment fitting at installation or change the location than trying to repair your shade. Recommended separation between shades of 18″ / 45cm allows for adequate airflow as well as avoiding chafe in windy conditions.
- Doors / Windows / Swings – Don’t forget to check that your shade will be well clear when doors are open not just when they are closed. This also applies to windows or any other moving objects such as hammocks, patio swing, etc that may not be in place when you plan your shade.
- Covering lights – if you have already installed outdoor lighting then check that your chosen shade location will not impede it.
- Runoff – If your shade is near a roof that does not have adequate guttering, check that when the water flows off the roof in a torrential downpour (little showers are not such a concern) that it will not adversely load the shade. Even with a suitable height difference, the runoff from a large roof on one part of a shade can easily overload a fixing.
Building Codes / Planning Permission
It is always worth checking with your local authority if permits or planning permission is required in your region especially if you are installing in a public or shared area. Many areas (eg Florida or California) have there own code for sun shades. In most cases, small domestic shades, at a reasonable height, in non-offensive colors and that can be removed seem to be allowed.
Due to the type and strength of the mounting point fixings, it is also recommended to check with any landlords before installation.
Stage 3: Which shade ? What Size?
Which Comes First? The sun shade or the mounting point?
As good as you may be at planning and installation, unless you have considerable experience (and even then!) it is unlikely that everything will always go to plan. To give yourself the best chance of success the first time, the method for planning a custom or a standard ready-made shade are slightly different.
Custom Shade – you should install all your mounting points first and then measure in order to buy the shade.
Ready-Made Shade – you should buy the shade and have it on-site, then install the mounting points.
Ready-Made Sun Shade
Having considered the factors above and assessed your possible mounting points, including ones where you may need to install a post, you can now measure an approximate size of the space where you are looking to have shade. From this you can look online at the various different sizes that are offered as standard and start to decide which dimensions are going to suit your situation. It may be that you have a number of different options that would work. Remember having multiple shades may give you the best results but is more expensive in hardware and installation costs.
Testing/Checking BEFORE you buy

In order to better visualize the different shades, I suggest that you use some rope/line and replicate the dimensions. ie if you are considering a 10′ x 10′ x 10′ triangle you measure 10′ of line and mark it and then repeat until you have 3 x 10′ lengths joined in a triangle. You can then lay out the shape on the ground and move it around to adapt for certain factors. This is the best way to get an accurate feeling for where the sun shade will be in order to assess where the best mounting points will be.
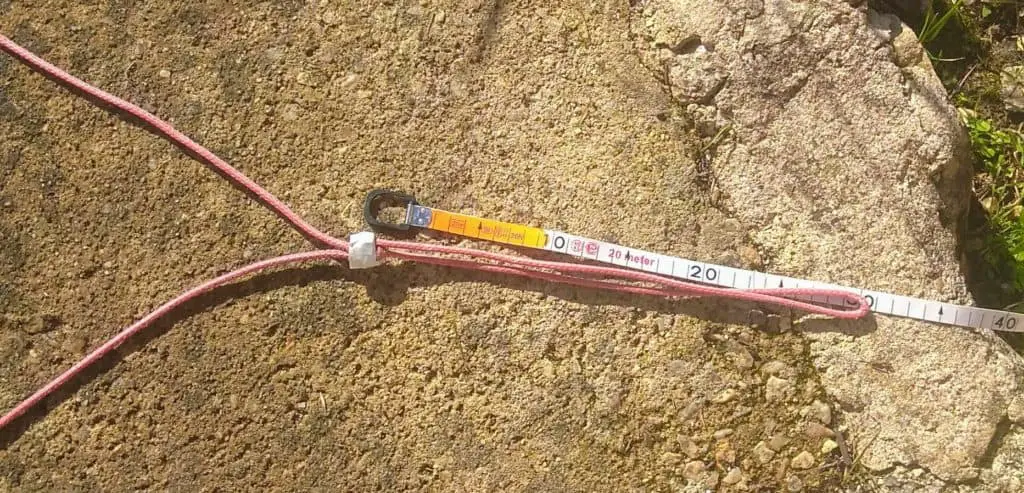
Not forgetting to allow 12″ / 30cm from each corner, away from the center of the shade, for fixings. This also helps in showing where the mounting point needs to be; when tensioned the fixings should point towards the middle of the shade.
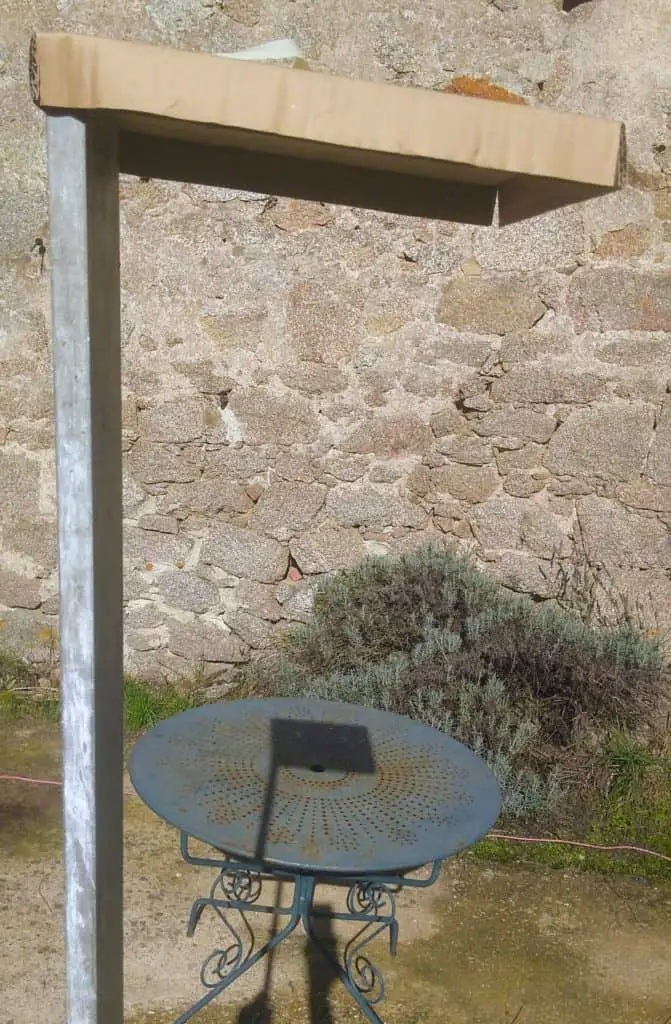
As part of this process you can then test, at the intended height of the shade, to check if you will get the shade in the expected location.
I tested for a shade height of 2.4m / 8′ (by using a piece of cardboard on a pole) and placing it where I was planning to have my new post. As you can see from the photo, this would mean that half of the table would still be in the sun.
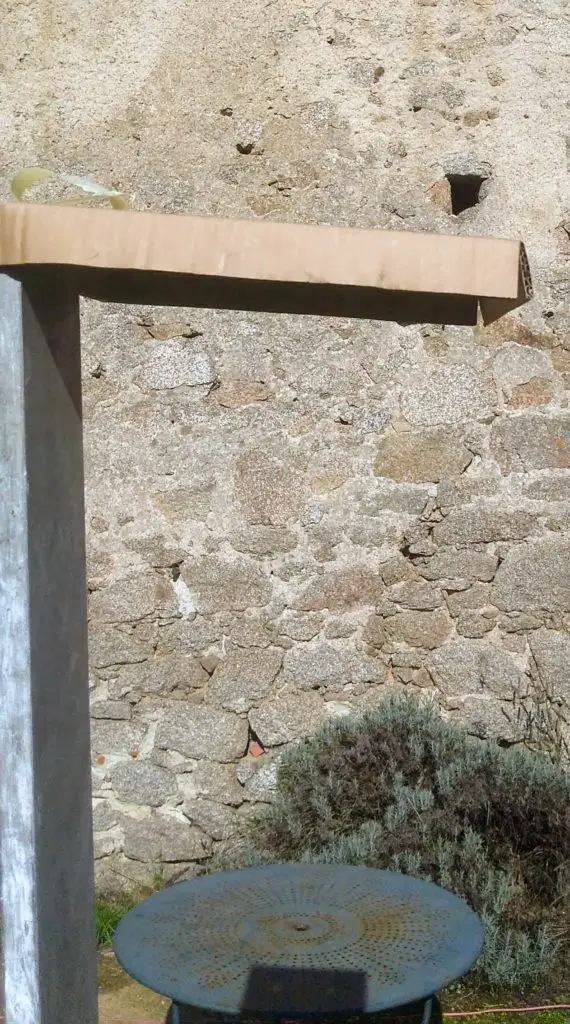
I then tested where the shadow would fall if I were to move the post further away from the wall. (Photo is shown having moved the post 20″ / 50cm)
With that knowledge, I can now decide either to move the post further out and have extensions on the wall side fixings of the sun shade or use a larger sun shade.
Note: If I plan to move the shade further from the wall, then the location of the two wall mounting points will change. This is why having the rope layout can really help!
Custom Made Sun Shade
Each company may have slightly different requirements in order for you to place your custom sun shade order. Depending on how far along the planning stage you are they might suggest a site survey, to help you asses the best mounting positions and the requirements for the size of shade you are considering. Even if you are happy to do this stage yourself, it would be wise to chat to the company before you start, to check what sort and what dimensions they would suggest for the fixings and tensioning devices, every situation is different and they have the experience!
Having determined the mounting point locations it is then normal to actually install the mounting points (add posts, pad eyes, eye bolts etc) so that when you then come to make your measurements, you can be confident in their accuracy. Your shade manufacturer should normally need the following information:
- A plan of your shade layout (a top-down sketch); this will allow them to understand the intended sun shade in relation to other objects and should also give them an indication of what the shade is going to be attached to, building, tree, post (even if yet to be installed) etc. Be sure to indicate any extensions; where you don’t want shade but it is distant from required from the mounting point.
- The height of the mounting point for each corner from ground level.
- Accurate distance from each mounting point to all the other mounting points. This is NOT the same as measuring the distance between mounting points at ground level! You need to measure the distance at the actual height of each mounting point to ensure that the changes in length due to variations in height are taken into account.
- When they enter the data into there software they can check for any potential errors if the lengths you have recorded are not actually possible and it lets them raise any concerns they may have.
NOTE Usually the sun shade manufacturer will make there own allowance (~10% longest edge or ~12″/30cm) for the gap required for fixings and tensioning devices. Therefore, they want to know the distances between the mounting points, NOT where you expect the corners of the shade to be.
If your layout has any extensions then be sure to mention them as the manufacturer needs to know that distance.
Types of shade cloth material – What do they mean?
There are two main styles of material that are used for sun shades, a mesh or a tighter woven fabric like canvas. The mesh, usually made from high-density polyethylene or a vinyl-coated polyester, has small gaps that allow some water to drain where the canvas style, even when not fully waterproof, can still hold water and need to be installed to allow for water runoff. In deciding between different manufacturers there are a number of other criteria that they use to differentiate themselves as explained below:
HDPE – High-Density Polyethylene
These are monofilament threads that make an inherently mold and mildew resistant fabric. They are usually constructed into a knitted mesh which boasts great dimensional stability, a high strength-to-weight ratio, and will not tear or fray if they’re cut or pierced. They can have different shade factor’s depending on the manufacturer and will drain when wet.
Canvas Style Fabric
These tend to have a higher shade factor but as they have a much tighter weave they do not let water drain as easily and therefore installing them with an angle to allow them to drain is more critical. In some cases the shelter offered by a shade that doesn’t allow water through is an additional benefit, making the shade dual purpose for hot or rainy weather.
Shade Factor / Openness Factor
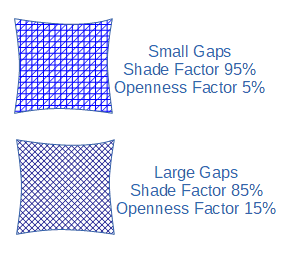
Shade Factor is a measure of the amount of light that passes through a shade. It is expressed as a percentage, where 100% means total blockage of light.
Openness Factor is the opposite of Shade Factor. ie If the Shade Factor is 90% then the Openness factor is 10%. The openness factor is of interest when using shade material like a curtain or blind that you still wish to see through.
NOTE: The shade factor is NOT the same as UV Block! It is possible for different fabrics to let through the same amount of light but block different amounts of UV.
GSM
This is a measurement of the weight of the material; Grams per Square Meter (GSM)
It is also an indication of the quality, strength and longevity of the material, as well as the price!
The lower and cheaper GSM ranges from 180 to 220GSM are readily found for the standard sizes on Amazon where the higher levels as used by the custom shade manufacturers and installers are from 300 – 550 GSM .
The equivalent in Ounces per Square Yard :
Lower ranges 5.3 – 6.5 oz sq/yd with higher levels by custom shade manufacturers and installers are 8.85 – 16.2 oz sq/yd
UV Block rating.
This represents the percentage of UV that is blocked by the shade. The higher the percentage the more of the harmful rays that are blocked. This factor can change depending on the colour of the shade chosen even when using the same material.
Color
The color of your shade is not just a decision for aesthetic reasons. The color can have an effect on the UV Block rating as well as on the ambient environment underneath the shade.
Lighter colors reflect more sunlight, which means the shade itself will not absorb the heat of the sun as quickly. This, in turn, means the area directly around the shade does not suffer as much from the radiated heat coming from the shade. This is not so important for a shade sail that is well ventilated but when the same shade cloth is used as part of a roller blind or against a window it can make a difference.
It is wrong, however, to assume that being under a darker shade will be hotter. Yes, the darker color will absorb more of the heat and light, rather than reflecting it, but the material is of such lightweight that it doesn’t really retain the heat, whereas something dense and solid, such as a flagstone does retain the heat and stays hot, even if it is a light color. The shade sail’s low thermal mass means that it cools easily just with the flow of air up through the mesh.
Lighter colors also have a lower shade factor (it is brighter underneath them) compared to darker colors of the same material. When light hits a lighter color the higher reflection causes the surface to appear brighter, with more glare, that can then make seeing through the shade harder. If you wish to see through your shade, to admire a particular view for example, then a darker color may be more suitable.
Popular Lighter Colors: White, bright colors (yellow, lime green etc) neutral colors
Popular Darker Colors: Black, dark grey, brown, blue.
Miscellaneous
Some shades also have other features that may be of interest such as:
- Flame Retardent; chemically treated to be more resistant to catching fire and burning more slowly if it does.
- Microbial Treatment; a chemical treatment to increase its resistance to bacteria, mold and mildew. e.g Microban®
- Low Emissions; some of the fabrics will release VOC’s (volatile organic compounds) which may make them unsuitable for use in commercial spaces, schools, health care facilities etc
Stages 4-6 – Check out How to Install and Tension a Sun Shade
or How to Install a Sun Shade Post for further advice.
