

Stages 4-6 of my Guide to ‘Everything’ for Shade Sails / Sun Shades. A sagging Sun Shade not only looks unsightly but is dramatically less efficient at shedding water and standing up to stronger winds. It will also reduce the life of your sunshade as it will flap and flex more than necessary causing the material to wear out faster. A properly installed sun shade is under tension, stretching the material in every direction.
The key to shade tension is the correct positioning and installation of your fixings to the mounting points. If the points are too close together or are not located in the right position (bisecting the angle of the Sun Shade’s corner; pointing to the middle of the sail) then no amount of tightening will remove the unwanted creases or loose material.
- Stages 1-3 : Planning for s Sun Shade – What you need to be thinking about!
- Bonus : How to Install a Sun Shade Post
Disclosure: There are affiliate links within this article, and at no extra cost, I earn a commission if you buy.
Stage 4 : Selecting the Right size Fixings
Fixings
– the metal hardware used to join the shade to the chosen mounting point.
As part of planning the location for your sunshade, you need to have allowed about 12″ / 30cm additional length at each corner of the shade for the fixings ie attachments and the tensioning devices.

Note: In most cases, it is possible to have one corner (only) of the sunshade simply attach to the hook or ring used at the mounting point, without a tensioning device, but all others should have some means of adjustment in order to correctly install the shade.
The standard fixings used are:

Eye Bolt / Ring Bolt – attaching to mounting point. These are designed for when you have access to both sides of the mounting position (such as a post) and allow you to add a washer and nuts for strength. The benefit of these is that the fixing can be made really tight (making it stronger) and that it keeps the attachment close to the mount. For larger shades ensure that the eye/ring is welded to make it a true ring, not simply bent to form a ring.

Hook Bolt – attaching to mounting point. Like the Eye Bolt these are designed for when you have access to both sides of the mounting position (such as a post) and allow you to add a washer and nuts for strength. The benefit of these is that the fixing can be made really tight (making it stronger) and that it keeps the attachment close to the mount. These will be weaker than an Eye Bolt of the same size and should only be used for smaller sails but have the potential advantage of not needing a D-Shackle to join it to the turnbuckle.

Pad Eye – attaching to mounting point. These provide a solid ring (like an eye bolt) but offer a little more flexibility in terms of how they are attached. They will have 2 or more holes and can then be used with bolts (where you access to both sides) or with screws (where you only have access from the front) or even a combination of the two. They benefit from spreading the load coming from the sunshade over a number of fixings holding the padeye in place. In many larger installations, custom pad eyes are used to adapt to the mounting position and ensure a solid attachment. Note: Check that the Pad Eye loop you buy has welded ends, not just a crimped end below the plate.

Lag Screws / Coach Screw / Lag Bolts– attaching to mounting point. Lag screws are heavy duty screws that have a hexagon head, so that they can withstand much higher insertion torque. They can be used in wood but also in masonry (bricks or concrete) if used along with a suitable wall anchor /shield / rawl plug. Note: In wood, as a rule of thumb, the pilot hole diameter needs to be half the diameter of the coach screw when using in softwood and three quarters when using in hardwood. For more info I found this Video useful.

Expansion Anchor / Lag Shields / Rawl Plugs– masonry / concrete attachments. These are items that are inserted into holes drilled into masonry or concrete. They line the hole and help to ensure when you then fix in your bolt or screw that they do not come out. These are usually matched with a suitable type of bolt / screw ie you specifically buy an Eye bolt with an expansion anchor ready for use in concrete.

Turnbuckle/ Bottlescrew / Rigging Screw– Tensioning device. This is a device that uses the mechanical advantage of threads to allow you to adjust the tension of the shade with relatively little effort. As you twist the ‘frame’, the total length of the turnbuckle can be reduced or extended as required. When first installed they should all be fully extended and then, when tensioning, the frame is twisted to make them shorter and increase the tension.

D- Shackle – Joining device. These are used to join any of the above fixings together and/or to the shade. They may also be used when adding chain or wire to extend the distance between a Turnbuckle and the shade. Eg If you have used an EyeBolt and have a Turnbuckle with a solid eye (as opposed to a hook) then you would use a shackle to join them.

Chain / Wire / Rope – Joining Device, Extensions. In some instances it is not possible to have the mounting point in exactly the perfect position. As long as the mounting position is still in line with the center of the shade and strong, then extending thru the use of chain or wire or rope is fine. It is not ideal, as although it is not increasing the shade area, it is increasing the length and makes the installation more prone to flapping but it works in the same way and is frequently necessary. NB: Extensions will NOT work if the mounting position is not in line. ie along a line from the center of the sail through the corner
NOTE: If your suitable mounting points are too close it probably means you need a smaller or custom sized shade or you need to create a new mounting position. Check out How to Install A Sun Shade Post.
How much tension? What size for the Fixings?
I only found one source to discuss the possible loadings: Sailrite.com
A correctly tensioned shade can have anything from 100 – 450lbs / 45 – 200Kg of edge tension.
You then need to allow for additional loading due to the wind affecting the shade; the larger the shade the greater the loading when windy.
Typical Loads when windy vary from 5-15 lbs per square foot / 24 – 73 Kgs per square meter of the surface area of the shade. That gives the total load experienced by the sun shade, you then divide by the number of corners of the shade to get the loading per fixing.
(These are for winds at a maximum of 75 mph / 120 Km/h)
When buying your fixings you can then check that they are rated to at least these loads.
For a triangluar shade : (sq. footage of shade x 15lbs per square foot) ÷ 3 corners = maximum load expected

eg A shade with 3 sides of 9 feet . Area of shade is 35 sq feet.
(35 x 15) / 3 = 175lbs is the maximum load expected at any one point.
A shade with 3 sides of 3m. Area of shade is 3.9m2
(3.9 x 73)/3 = 94.9 Kgs is the maximum load expected at any one point.
For a four-sided shade: (sq. footage of shade x 15 lbs per square foot) ÷ 4 corners = maximum load expected

eg A square shade with four sides at 9 feet. Area of shade is 81sq feet.
(81 x 15) / 4 = 303lbs is the maximum load expected at any one fixing point.
A square shade with four sides at 3m. Area of shade is 9m2
(9 x 73) / 4 = 164.25Kgs is the maximum load expected at any one fixing point.
eg A rectangular shade with two sides at 12 feet and two at 15 feet. Area of shade is 180sq feet.
(180 x 15) / 4 = 675lbs is the maximum load expected at any one fixing point.
A rectangular shade with two sides at 4m and 3m. Area of shade is 12m2
(12 x 73) / 4 = 219 Kgs is the maximum load expected at any one fixing point.
These calculations can help you ensure that you are not buying fittings that are too weak but a normal minimum size, for anything but the smallest shade, seems to be 8mm for the shaft diameter for bolts and eye’s. It is also recommended that the fittings are stainless steel (preferably 316 grade) to help reduce any corrosion issues, particularly for the turnbuckles.
Stage 5: Mounting Points; Can I attach to…
As explained above, the amount of load that is passed from the sunshade to the mounting points, on a windy day, is many, many times higher than the basic load required for correctly tensioning the sunshade. You then need to consider the extra loads when the shade it wet (even if it drains and doesn’t hold water) or even worse, if it isn’t correctly tensioned and it allows water to build up or starts to flap and flog around like a flag. The strength of the mounting points is really important.
The mounting point fixings are the hardware that then allows you to attach the shade. These fixings will give you either an eye / ring or a hook into which you can then attach your turnbuckle.
Top Tip: When you install your Eye bolt, Pad eye or hook try to keep it aligned with the direction of load. That means if the main load is along the side of your house then they should be horizontal, if the load is down/up they should be vertical and if its a combination then they should be slightly twisted.
Attaching Sun Shade to House Fascia
YES. Due to the loads involved, simply screwing or bolting into the fascia is asking for trouble. The fascia is not designed to be a load-bearing surface and the original fixing methods alone are unlikely to be sufficient.
Instead, you should adjust your fixing location further away from the required position to allow the fixing to line up with one of the trusses or rafters that hold the fascia board. In some cases, you cannot attach directly thru the fascia into the rafter and then you should use a ‘fascia support’ (a bracket that screws into both) to reinforce the fascia next to the rafter. You can then attach your fixing to the fascia, ideally within a few inches / cm of the rafter and on the opposite side to the fascia support.
Attaching Sun Shade to Bricks / Cinder Block / Breeze Block / Cement Block
YES. Attaching to bricks can make for a very secure mounting point but it is necessary to make some initial assessments to ensure that is the case. It will also help you to decide if you should use a Pad Eye, with multiple fixings required or simply a single Eye Bolt. The Pad Eye is good as it reduces the load on any one of its fixings but it does require more holes that may not be in ideal places. The Eyebolt has the benefit of only needing to have one mounting point but that point needs to be stronger as it will have all the load.
When drilling into brick walls you will then need to decide if you drill into the brick itself or the mortar. A brick / block in good condition will usually offer a better fixing and will support more load than mortar but there are other things to consider.
For the loads involved with the sun shade, ~60-100lbs just in installation, not including the additional dynamic loads when the shade is wet or in windy conditions, you will require deep holes and expansion-style anchors / rawl plugs. Therefore if you have old, fragile brick drilling into it may not be the best choice. Deep holes weaken the brick and expansion anchors can create enough circular stress to crack the brick. If your bricks show signs of cracks or spalling, drill into the mortar instead. That way the anchor’s circular expansion forces push against fully intact bricks.
Cinder / breeze / Cement blocks and some bricks have internal holes, as part of there design. This does not mean they are not suitable but simply means when purchasing your fixing you should consider the type of anchor / shield / rawl plug that is used. Depending on your particular type of masonry you will find an anchor to suit. In some cases it may be recommended to use a chemical fixing as well as the shield / rawl plug for your particular type of brick.
Attaching Pad Eye to Masonry.
Yes. My suggestion if attaching a pad eye is to use Lag Screw’s with a hex head that screws into a matching lag shield / rawl plug. Note: If you are going to drill into brick then ideally you should avoid having more than 1 fixing per brick and avoid drilling near the edge. That might require you to use a larger style of pad eye or a custom plate where the fixing positions are more spread out.
Note: Attaching to bricks / blocks that are part of a dividing/separating wall that is not load-bearing (ie it is cosmetic rather than structural, such as those separating gardens) is not recommended as they may not have the strength required, at the height usually desired, for a sun shade.
Attaching Sun Shade to Concrete
YES. Concrete makes for a great mounting point and the actual fixings used are usually the same as those explained above for bricks. As concrete is solid (where some bricks have holes by design) then the type of anchor / rawl plug you choose may be slightly different.
Attaching Sun Shade to a Tree
YES. Using a tree as a mounting point is often easier than having to install a new post but do consider it for temporary use and make sure it is large enough for the sail. It is very difficult to judge the amount of sideways loading a tree can withstand but as a guide for anything more than about a 20’sq / 6m2 sun shade, the tree should be 250 – 300mm diameter at the attachment point.
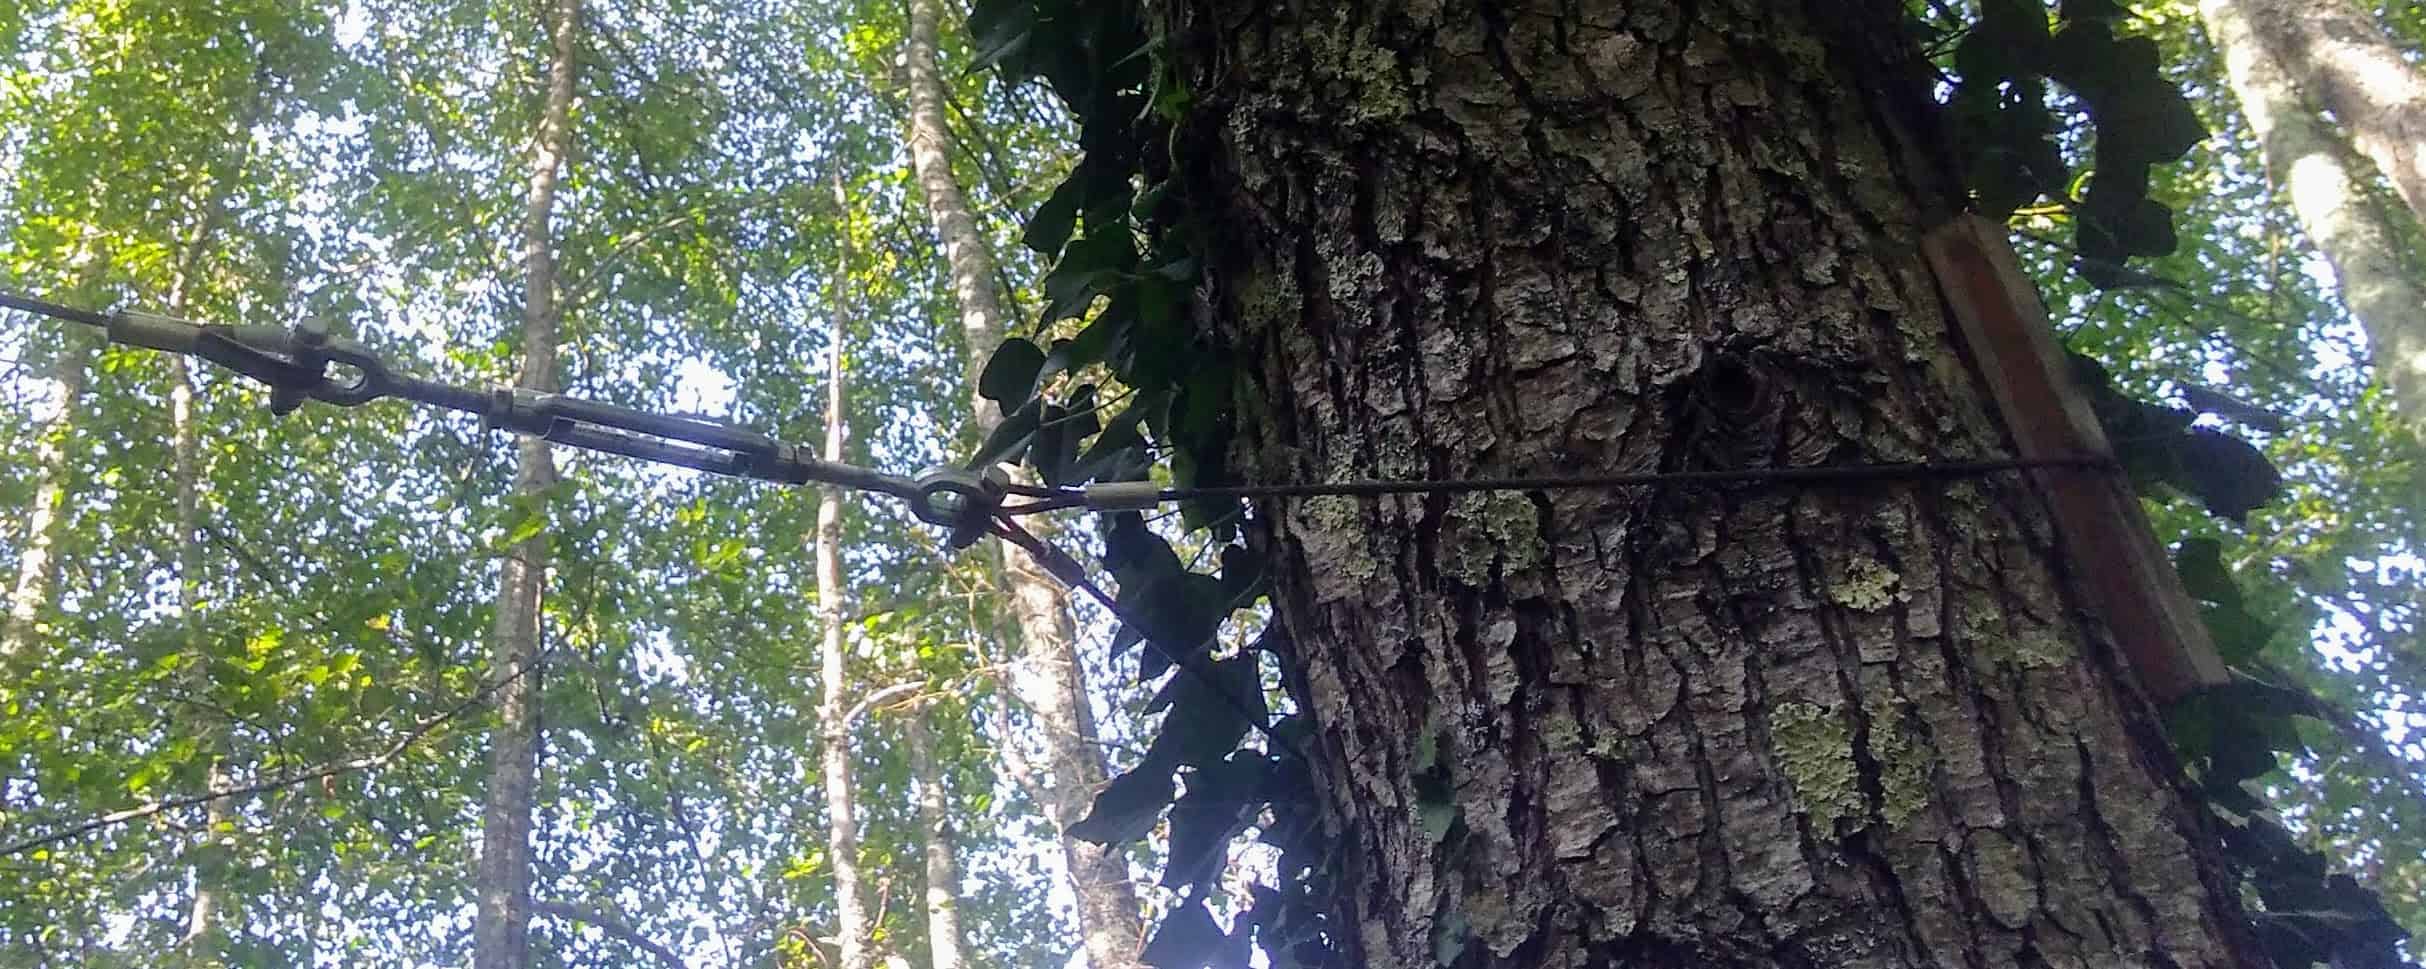
To avoid damaging the tree it is suggested that rather than using metal screws or fixings to attach to the tree you instead pad the tree (using short strips of wood or material) and then wrap around it a couple of times with a length of steel wire / cable and then attach your turnbuckle to that.
Attaching sun shade to a Fence Post
YES. It is possible, however, the loading on a post for a sun shade is different from those usually experienced by a fence post and as such the method used for installing the fence post may not be adequate to suit a sun shade. It may, however, be possible to replace that one fence post with one of suitable dimensions and footings to do both jobs. (Check out How to Install a Sun Shade Post.) It may also be possible to reinforce the existing fence post with guy wires (pulling) or extra struts (pushing) to keep the post in position.
Stage 6: How to Connect and Tension the Sun Shade
Preparation
- Ideally, this is done on a calm wind-free day and with some assistance, as even a small sun shade flapping, with metal fixings on its corners, can hurt.
- Following the layout from when you planned your sun shade (Check out here for Planning a Sun Shade) you can go to each corner of your sun shade and attach either just the carabiner or an extention wire / chain with D-shackles and the carabiner.
- Ensure that the turnbuckles are fully extended. Whilst stopping the end bolts from moving, twist the central frame anti-clockwise, this should extend the turnburckle and make it as long as possible. Note: The bolts should always be fully thru the frame and should be extended equally at both ends. It is a good idea to add some lubrication (Teflon, grease, vaseline or similar) to the threads of the rigging screws, as Stainless Steel threads are often prone to ‘binding’ or locking up. The lubrication will avoid this.
- Attach the turnbuckles to the mounting point fixings; depending on your chosen turnbuckle that may require attaching with a shackle or simply hooking it on.
Top Tip: My suggested fixing layout is to have the turnbuckle attached to the mounting point fixing not to the shade. This is the heaviest part of the hardware and it is being kept closest to the solid mounting point where it will move least. This will be of particular benefit if you ever have to quickly remove the sun shade on a wet and windy evening when it will be flapping about!
Corner Pulling Methods – to aid installing the shade at height.

Using a simple rope / line
– Thread a line up through the mounting point fixing (not the turnbuckle) and tie it to the corner of the shade. When you then pull on the line (which can be done while you are standing on the ground) the corner is pulled up towards the mounting point and when at the correct distance the line can be tied off. When you then climb a ladder you have both hands free and the two fixings to be joined (turnbuckle and carabiner) are not under tension making them easier to manoeuver.

Using a basic line / rope purchase system
– Thread the line up through the mounting point fixing (not the turnbuckle) and then through the corner of the shade and back to tie it to the mounting point fixing. Now when you pull on the line you have added purchase and doubled the amount of tension being used to pull the corner towards the mounting point.

Using a more advanced purchase system
– Thread the line up through the mounting point fixing (not the turnbuckle) and then through the corner of the shade and back and through the mounting point fixing and then back and tie it to the corner of the sail. Each time you add another ‘loop’ (line going through mounting point – through corner of the sail and back) you are increasing the purchase and amount of tension, however, in practice anything more than 2-3 loops becomes a little unworkable and the line starts to get in the way when being pulled and the friction reduces any gains.
Attaching Sun Shade
- If you have one corner of the sun shade without a turnbuckle (usually because you are trying to keep the shade as close as possible to that point) then attach this point first.
- Then go to each corner, in turn, and join the sun shade to the turnbuckle. When working at height and particularly if working alone this can be quite a challenge, check some of the corner pulling methods outlined above.
- When you get to the final corner you should expect it to be quite tight and you will possibly need to use a purchase system (outlined above) to stretch/pull the corner, even when all the turnbuckles are extended. This is normal and does not necessarily mean your shade is the wrong size.
- When all the corners are attached you should increase the tension of the sail evenly. This means you should not just wind up fully on one turnbuckle and then go to the next.
Tensioning the Sun Shade
- You should turn the frame of one turnbuckle clockwise about two full rotations, and then move to the next corner’s turnbuckle until you have done them all. If the tension is not correct you repeat the process and for fine adjustments, you will only need to turn the frame 1/2 a rotation.
- When the shade is loose you may have to hold the shade end of the turnbuckle, whilst tightening it, to stop it twisting the shade until there is sufficient tension.
- As the tension increases you will need to use a screwdriver (or another tool) to help in turning the turnbuckle frame. Simply thread it through the frame and use it as a lever for turning.
- The correct tension for a standard shade (~100 – 150lbs / 45 – 68kgs) is when the shade is taut and there are no creases in any direction. When taut, a standard shade should flex as a single piece without rippling or flapping in the wind.
- Larger shades or those with an outer edge with steel wire threaded thru, can be tensioned even tighter (upto ~450lbs edge tension) to the extent that the whole installation should appear almost solid, and the shade like a drum.
- To avoid over tensioning standard shades, then stop when the shade is taut and only adjust further to remove any creases. This may require a bit of trial and error to get the tensioning just right but remember that this may include releasing some tension not just making everything tighter.
- As a general guide then if the creases are across a corner then that turnbuckle may need to be tighter or the turnbuckles on either side might need to be looser.
When everything is set, then tighten the locking nuts on the turnbuckles to stop them from accidentally loosening. (If your turnbuckles do not have a locking nut then threading a cable tie through the frame and through one of the eyes will also stop it turning itself loose). You should also ‘nip up’ (tighten just a bit past hand tight) the shackles with a tool to also ensure they do not come loose.
Note: Turnbuckles will allow you to generate a massive amount of tension. Do not simply tighten them to their max as this may be overtightening the material.
Care / Maintenance
- In most cases, the shade’s are not designed to be left up in high winds and the quality of the installation and the material chosen will reflect what wind speed this may be.
- Even shades that say they are permeable (let water through) will suffer in torrential downpours if installed horizontally with no changes in height. Yes, they will drain but during the heavy rain they can pool water that is landing faster than it drains.
- Clearing / Cleaning the shades once a season to avoid a build-up of leaves dust or other debris that will clog the mesh.
- The shades are not meant to support snow! The additional loads of even a few inches of snow, when the material is cold can cause damage.
- Cleaning of most shades should be done without the use of abrasives or strong cleaning chemicals. Where the shade may have anti-bicrobial, fire retardent etc treatments the chemicals and harsh rubbing may have an adverse affect. The best thing is to soak the shade in a gentle cleaning solution and then hose it off. (Not pressure washing)
- If you do not wish to take the shade down then simply spraying water from the underside and wiping with a soft soapy cloth to move/loosen any debris should help keep it in great condition.
That’s It!
Your awesome new shade should keep you protected from the sun and staying cool in the shade for many years to come. Where I am only using mine for sun shade during the summer months, I plan to take mine down and to store it to increase its longevity and avoiding unnecessary exposure to the sun.
Bonus – Check Out How to Install a Sun Shade Post
or see our Frequently Asked Questions – Shade Sails for further advice.